dave spink toolset
|
|
dave spink toolset |
|
|
LINUX TASKS: |
|||
| PERFORMANCE | NFS | QUOTAS | X CONFIG |
| iSCSI | COMMANDS | ||
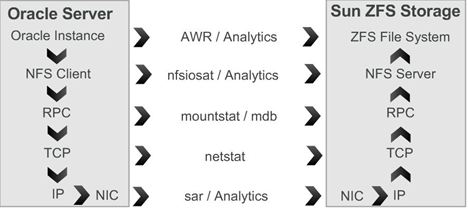
PERFORMANCEDisk (block) access. # iostat -x 5 NFS access. # nfsstat 5 RPC statisitics. # mountstat 5 CPU consumption. # mpstat -P ALL Network interface. # sar -n DEV 5 TCP send/receive queue. # netstat -a 5 or netstat -a 5 | grep NFS IO Flow
NFSGeneral NAS Example showmount -e zfs1 mount -t nfs -o rw,bg,hard,rsize=1048576,wsize=1048576,vers=3,nointr,proto=tcp,suid zfs1:/export/zspink1/fs1 /test/mnt1 Single Instance Linux Mount Point Options DataFiles - rw,bg,hard,nointr,rsize=1048576,wsize=1048576,tcp,vers=3,timeo=600 Binaries - rw,bg,hard,nointr,rsize=1048576,wsize=1048576,tcp,vers=3,timeo=600 RAC Linux Mount Point options Datafiles - rw,bg,hard,nointr,rsize=1048576,wsize=1048576,tcp,vers=3,timeo=600,actimeo=0 Binaries - rw,bg,hard,nointr,rsize=1048576,wsize=1048576,tcp,vers=3,timeo=600,actimeo=0 RMAN Mount point option for Linux rw,bg,hard,nointr,rsize=1048576,wsize=1048576,tcp,vers=3,timeo=600 Generate files
$ cat auto-file.sh

#!/bin/bash
filecount=0
while [ $filecount -lt 1000 ]
do
filesize=$RANDOM
filesize=$(($filesize+64000))
base64 /dev/urandom | head -c "$filesize" > /test/mnt1/file${filecount}.$RANDOM
base64 /dev/urandom | head -c "$filesize" > /test/mnt2/file${filecount}.$RANDOM
base64 /dev/urandom | head -c "$filesize" > /test/mnt3/file${filecount}.$RANDOM
base64 /dev/urandom | head -c "$filesize" > /test/mnt4/file${filecount}.$RANDOM
base64 /dev/urandom | head -c "$filesize" > /test/mnt5/file${filecount}.$RANDOM
((filecount++))
done
NFS STARTModify the /etc/exports file. See example of format that contains share, client and options. The main options are read only ("ro"), read write ("rw"), and ("no_root_squash") that allows root user on the client to have root access on the NFS server. The default access for root user on the client is user "nobody" on the NFS server. # cat /etc/exports /media/CXSERIES 10.70.80.164(ro) Prevent hosts for accessing your shares. # vi /etc/hosts.deny portmap:ALL lockd:ALL mountd:ALL rquotad:ALL statd:ALL Modify the hosts that are allowed access. # vi /etc/hosts.allow portmap: 10.70.80.164 lockd: 10.70.80.164 rquotad: 10.70.80.164 mountd: 10.70.80.164 statd: 10.70.80.164 Set the ports that NFS will use. # vi /etc/sysconfig/nfs LOCKD_TCPPORT=48620 LOCKD_UDPPORT=48620 MOUNTD_PORT=48621 STATD_PORT=48622 RQUOTAD=no RQUOTAD_PORT=48623 Open the firewall to allow access for NFS and portmap. /sbin/iptables -I RH-Firewall-1-INPUT -m state --state NEW -m tcp -p tcp --dport 111 -j ACCEPT /sbin/iptables -I RH-Firewall-1-INPUT -m state --state NEW -m tcp -p tcp --dport 2049 -j ACCEPT /sbin/iptables -I RH-Firewall-1-INPUT -m state --state NEW -m tcp -p tcp --dport 48620 -j ACCEPT /sbin/iptables -I RH-Firewall-1-INPUT -m state --state NEW -m tcp -p tcp --dport 48621 -j ACCEPT /sbin/iptables -I RH-Firewall-1-INPUT -m state --state NEW -m tcp -p tcp --dport 48622 -j ACCEPT /sbin/iptables -I RH-Firewall-1-INPUT -m state --state NEW -m tcp -p tcp --dport 48623 -j ACCEPT /sbin/iptables -I RH-Firewall-1-INPUT -m state --state NEW -m udp -p udp --dport 111 -j ACCEPT /sbin/iptables -I RH-Firewall-1-INPUT -m state --state NEW -m udp -p udp --dport 2049 -j ACCEPT /sbin/iptables -I RH-Firewall-1-INPUT -m state --state NEW -m udp -p udp --dport 48620 -j ACCEPT /sbin/iptables -I RH-Firewall-1-INPUT -m state --state NEW -m udp -p udp --dport 48621 -j ACCEPT /sbin/iptables -I RH-Firewall-1-INPUT -m state --state NEW -m udp -p udp --dport 48622 -j ACCEPT /sbin/iptables -I RH-Firewall-1-INPUT -m state --state NEW -m udp -p udp --dport 48623 -j ACCEPT Start the NFS services. # /etc/init.d/portmap start Starting portmap: [ OK ] # /etc/init.d/nfs start Starting NFS services: [ OK ] Starting NFS daemon: [ OK ] Starting NFS mountd: [ OK ] See list of NFS shares available. # showmount -e localhost Export list for localhost: /media/CXSERIES 10.70.80.164 Connect client. # mount 10.152.3.236:/media/CXSERIES /mnt Close the firewall after NFS access completed. /sbin/iptables -I RH-Firewall-1-INPUT -m state --state NEW -m tcp -p tcp --dport 111 -j REJECT /sbin/iptables -I RH-Firewall-1-INPUT -m state --state NEW -m tcp -p tcp --dport 2049 -j REJECT /sbin/iptables -I RH-Firewall-1-INPUT -m state --state NEW -m tcp -p tcp --dport 48620 -j REJECT /sbin/iptables -I RH-Firewall-1-INPUT -m state --state NEW -m tcp -p tcp --dport 48621 -j REJECT /sbin/iptables -I RH-Firewall-1-INPUT -m state --state NEW -m tcp -p tcp --dport 48622 -j REJECT /sbin/iptables -I RH-Firewall-1-INPUT -m state --state NEW -m tcp -p tcp --dport 48623 -j REJECT /sbin/iptables -I RH-Firewall-1-INPUT -m state --state NEW -m udp -p udp --dport 111 -j REJECT /sbin/iptables -I RH-Firewall-1-INPUT -m state --state NEW -m udp -p udp --dport 2049 -j REJECT /sbin/iptables -I RH-Firewall-1-INPUT -m state --state NEW -m udp -p udp --dport 48620 -j REJECT /sbin/iptables -I RH-Firewall-1-INPUT -m state --state NEW -m udp -p udp --dport 48621 -j REJECT /sbin/iptables -I RH-Firewall-1-INPUT -m state --state NEW -m udp -p udp --dport 48622 -j REJECT /sbin/iptables -I RH-Firewall-1-INPUT -m state --state NEW -m udp -p udp --dport 48623 -j REJECT Stop the NFS services. # /etc/init.d/portmap stop Stopping portmap: [ OK ] # /etc/init.d/nfs stop Shutting down NFS mountd: [ OK ] Shutting down NFS daemon: [ OK ] Shutting down NFS services: [ OK ] QUOTASTo enable quotas per file system you first need to modify the /etc/fstab file to include the mount option usrquota and grpquota. If no process is using the file system run umount / mount, else reboot. # cat /etc/fstab /dev/sda2 / ext3 rw,acl,usrquota,grpquota 1 1 Once this is complete you have a file system capable of supporting quotas. Next run the quotacheck command (with the create option) to examine and build a table of current disk usage per file system. For the root file system you may receive the following error "quotacheck: Cannot remount filesystem mounted on / read-only so counted values might not be right. Please stop all programs writing to filesystem or use -m flag to force checking.". Hence use the -m option. # quotacheck -cugm / The remaining task is to assign disk quotas for the user. The command edquota creates a temporary asci file that allows you to modify the quotas per user. # edquota spi0004 Disk quotas for user spi0004 (uid 500): Filesystem blocks soft hard inodes soft hard /dev/sda2 6175696 0 0 117793 0 0 You may set limits via the number of blocks and or the number of inodes. The hard limit is as the names suggests, while the soft limit lets the user continue although issues warnings. You set a grace period for these soft limit warnings via edquota -t command. # edquota -t Grace period before enforcing soft limits for users: Time units may be: days, hours, minutes, or seconds Filesystem Block grace period Inode grace period /dev/sda2 7days 7days Verify user quotas are working. # quota spi0004 You may also assign quotas based on group. The concept is similar to that described for users above. # edquota -g ecommgp # quota -g ecommgp Check what file systems have quotas enabled. # quotacheck -avug quotacheck: Quota for users is enabled on mountpoint / so quotacheck might damage the file. Please turn quotas off or use -f to force checking. Turn quotas off and on if needed # quotaoff -vaug /dev/mapper/VolGroup00-LogVol00 [/]: group quotas turned off /dev/mapper/VolGroup00-LogVol00 [/]: user quotas turned off # quotaon -vaug /dev/mapper/VolGroup00-LogVol00 [/]: group quotas turned on /dev/mapper/VolGroup00-LogVol00 [/]: user quotas turned on Report on quota usage for all file systems.
# repquota -a | more
*** Report for user quotas on device /dev/sda2
Block grace time: 7days; Inode grace time: 7days
                        Block limits                File limits
User            used    soft    hard  grace    used  soft  hard  grace
----------------------------------------------------------------------
root      -- 6444140       0       0         193501     0     0
daemon    --      24       0       0              3     0     0
adm       --       8       0       0              1     0     0
lp        --      16       0       0              2     0     0
X CONFIGThe configuration files X.org-X11 is called xorg.conf and located in /etc/X11. Binaries and libraries are stored under /etc/X11R6. You may configure the file manually or use a X Configuration tool. The easiest approach in Fedora is to run the GUI tool. # system-config-display Another approach to getting X working is entering a mode where X is not started, modify the configuration file and test the config. If everything works return to the desired run level. # telinit 3 # vi /etc/X11/xorg.conf # startx # telnet 5 To restart X while maintaining a X-enabled runlevel you need to kill the X server. The X server can be killed with Ctrl+Alt+Backspace or issuing the kill command. # ps ax | grep X 2644 tty7 SLs+ 15:18 /usr/bin/Xorg :0 -audit 0 -auth /var/gdm/:0.Xauth vt7 # kill 2644 To allow other uses access to X Server run gdmsetup. Select the security tab and uncheck the "Deny TCP connections to X Server. # gdmsetup From remote connections when running IP Tables allow port 6000. On Fedora run system-config-securitylevel, click other ports add 6000. # system-config-securitylevel # iptables -L -t filter Chain RH-Firewall-1-INPUT (2 references) target prot opt source destination ACCEPT all -- anywhere anywhere ACCEPT icmp -- anywhere anywhere icmp any ACCEPT ipv6-crypt-- anywhere anywhere ACCEPT ipv6-auth-- anywhere anywhere ACCEPT udp -- anywhere 224.0.0.251 udp dpt:mdns ACCEPT udp -- anywhere anywhere udp dpt:ipp ACCEPT tcp -- anywhere anywhere tcp dpt:ipp ACCEPT all -- anywhere anywhere state RELATED,ESTABLISHED ACCEPT tcp -- anywhere anywhere state NEW tcp dpt:ftp ACCEPT tcp -- anywhere anywhere state NEW tcp dpt:ssh ACCEPT udp -- anywhere anywhere state NEW udp dpt:netbios-ns ACCEPT udp -- anywhere anywhere state NEW udp dpt:netbios-dgm ACCEPT tcp -- anywhere anywhere state NEW tcp dpt:netbios-ssn ACCEPT tcp -- anywhere anywhere state NEW tcp dpt:microsoft-ds ACCEPT tcp -- anywhere anywhere state NEW tcp dpt:https ACCEPT tcp -- anywhere anywhere state NEW tcp dpt:telnet ACCEPT tcp -- anywhere anywhere state NEW tcp dpt:http ACCEPT tcp -- anywhere anywhere state NEW tcp dpt:x11 REJECT all -- anywhere anywhere reject-with icmp-host-prohibited For remote X Server access you may need to update the .Xauthority file. Running "xauth add" creates a cookie in the .Xauthority file which is basically the password to your local X server. linux% xhost + linux% /usr/bin/xauth list d1de0199.cpships.com:0 MIT-MAGIC-COOKIE-1 d700206a15452c64d6c471f82da78f83 sun1# /usr/openwin/bin/xauth add $DISPLAY MIT-MAGIC-COOKIE-1 d700206a15452c64d6c471f82da78f83 sun1# ls -l /.Xauthority -rw------- 1 root other 49 Aug 11 18:17 /.Xauthority iSCSI OEL 7Install the iscsi-initiator-utils package # yum install iscsi-initiator-utils Start the iSCSI service # service iscsi start Note the iSCSI intiator name # cat /etc/iscsi/initiatorname.iscsi InitiatorName=iqn.1988-12.com.oracle:1a3ae8c72ea8 Discover the iSCSI targets # iscsiadm -m discovery -t sendtargets -p 10.0.2.9 10.0.2.9:3260,2 iqn.1986-03.com.sun:02:75fe045e-9397-c9f3-9cbb-88340860c8db Display information about the targets that is now stored in the discovery database # iscsiadm -m discoverydb -t st -p 10.0.2.9 discovery.startup = manual discovery.type = sendtargets discovery.sendtargets.address = 10.0.2.9 discovery.sendtargets.port = 3260 .. discovery.sendtargets.timeo.login_timeout = 15 discovery.sendtargets.use_discoveryd = No discovery.sendtargets.discoveryd_poll_inval = 30 discovery.sendtargets.reopen_max = 5 discovery.sendtargets.timeo.auth_timeout = 45 discovery.sendtargets.timeo.active_timeout = 30 discovery.sendtargets.iscsi.MaxRecvDataSegmentLength = 32768 Establish a session and log in to a specific target # iscsiadm -m node -T iqn.1986-03.com.sun:02:75fe045e-9397-c9f3-9cbb-88340860c8db -p 10.0.2.9:3260 -l Verify the sessions is active, and display available LUNs
# iscsiadm -m session --rescan
# iscsiadm -m session -P 3
    ************************
		Attached SCSI devices:
		************************
		Host Number: 3	State: running
		scsi3 Channel 00 Id 0 Lun: 0
			Attached scsi disk sdb		State: running
See SCSI block device # fdisk -l | grep /dev/sdb Disk /dev/sdb: 10.7 GB, 10737418240 bytes, 20971520 sectors # grep "Attached SCSI" /var/log/messages oel kernel: sd 3:0:0:0: [sdb] Attached SCSI disk Create a file system and mount # mkfs.ext4 /dev/sdb # mkdir /mnt/iscsiTest # mount /dev/sdb /mnt/iscsiTest Make it persistent across reboots by editing the /etc/fstab file # blkid /dev/sdb /dev/sdb: UUID="1bfe062c-1357-446f-86cc-1fa89a55bbba" TYPE="ext4" # vi /etc/fstab UUID=1bfe062c-1357-446f-86cc-1fa89a55bbba /mnt/iscsiTest ext4 _netdev 0 0 When you expand the volume or disk, you might need to rescan. # iscsiadm -m node -p 10.0.2.9 --rescan # fdisk -l | grep /dev/sdb Disk /dev/sdb: 12.9 GB, 12884901888 bytes, 25165824 sectors # e2fsck -f /dev/sdb /dev/sdb: clean, 28/655360 files, 249666/2621440 blocks # resize2fs /dev/sdb Resizing the filesystem on /dev/sdb to 3145728 (4k) blocks. The filesystem on /dev/sdb is now 3145728 blocks long. |