dave spink toolset
|
|
dave spink toolset |
|
|
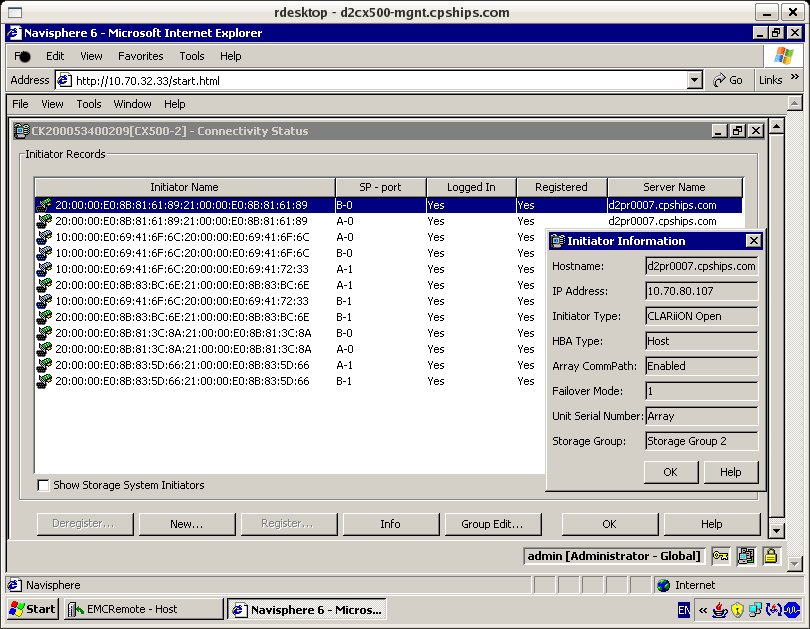
NAVI AGENTPrepare Host 1. Ensure you have EMC CLARiion supported HBA driver. 2. Server connected to both SP's. 3. Run Qlogic Wizard to ensure peristent binding and LUNZ visible. 4. Latest recommended patch cluster. Install Host Agent (all) # pkgadd -d ./NAVIAGNT.pkg 1 NAVIAGENT Navisphere Disk Array Management Tool (AGENT) (sparc) 6.19.0.4.14 2 NAVICLI Navisphere Disk Array Management Tool (CLI) (sparc) 6.19.0.4.14 3 NAVISCLI Navisphere Disk Array Management Tool (CLI) (sparc) 6.19.0.4.14 Installing Admsnap Utility (recommended if you purchased SnapView) # pkgadd -d ADMSNAP.pkg The following packages are available: 1 ADMSNAP Navisphere Admsnap (sparc) V2.9.0.0.7 Modify User Login Script MANPATH=$MANPATH:/opt/Navisphere/man PATH=$PATH:/opt/Navisphere/bin LD_LIBRARY_PATH=$LD_LIBRARY_PATH:/opt/Navisphere/lib Add User to Agent Config File vi /etc/Navisphere/agent.config user spi0004 Start Host Agent # cd /etc/init.d # ./agent start Check Registered Host # cd /opt/Navisphere/bin # ./navicli register -list Devicename: c3t0d0s0 Serial Number: APM00051802420SPA Server Name: d1pr9tmp.cpships.com Server IP Address: 10.140.128.150 Device Driver Name: Model Description: Vendor Description: Has Register Attempted: YES Register Error: NO Devicename: c3t2d0s0 Serial Number: APM00051802420SPB Server Name: d1pr9tmp.cpships.com Server IP Address: 10.140.128.150 Device Driver Name: Model Description: Vendor Description: Has Register Attempted: YES Register Error: NO Verify Initiator Records via NaviSphere
PATH MGNTSee Host Disk Selections
# format
AVAILABLE DISK SELECTIONS:
       0. c1t0d0 SUN72G cyl 14087 alt 2 hd 24 sec 424
          /pci@1f,700000/scsi@2/sd@0,0
       1. c1t1d0 SUN72G cyl 14087 alt 2 hd 24 sec 424
          /pci@1f,700000/scsi@2/sd@1,0
       2. c3t0d0 drive type unknown
          /pci@1d,700000/fibre-channel@1/sd@0,0
       3. c3t2d0 DGC-RAID10-0219 cyl 61438 alt 2 hd 256 sec 16
          /pci@1d,700000/fibre-channel@1/sd@2,0
If you issue a LUN trespass on the Storage Array the alternate path becomes active.
# format
AVAILABLE DISK SELECTIONS:
       0. c1t0d0 SUN72G cyl 14087 alt 2 hd 24 sec 424
          /pci@1f,700000/scsi@2/sd@0,0
       1. c1t1d0 SUN72G cyl 14087 alt 2 hd 24 sec 424
          /pci@1f,700000/scsi@2/sd@1,0
       2. c3t0d0 DGC-RAID10-0219 cyl 61438 alt 2 hd 256 sec 16
          /pci@1d,700000/fibre-channel@1/sd@0,0
       3. c3t2d0 drive type unknown>
          /pci@1d,700000/fibre-channel@1/sd@2,0
And back again i.e. We trespassed back to the original SP.
# format
AVAILABLE DISK SELECTIONS:
       0. c1t0d0 SUN72G cyl 14087 alt 2 hd 24 sec 424
          /pci@1f,700000/scsi@2/sd@0,0
       1. c1t1d0 SUN72G cyl 14087 alt 2 hd 24 sec 424
          /pci@1f,700000/scsi@2/sd@1,0
       2. c3t0d0 drive type unknown
          /pci@1d,700000/fibre-channel@1/sd@0,0
       3. c3t2d0 DGC-RAID10-0219 cyl 61438 alt 2 hd 256 sec 16
          /pci@1d,700000/fibre-channel@1/sd@2,0
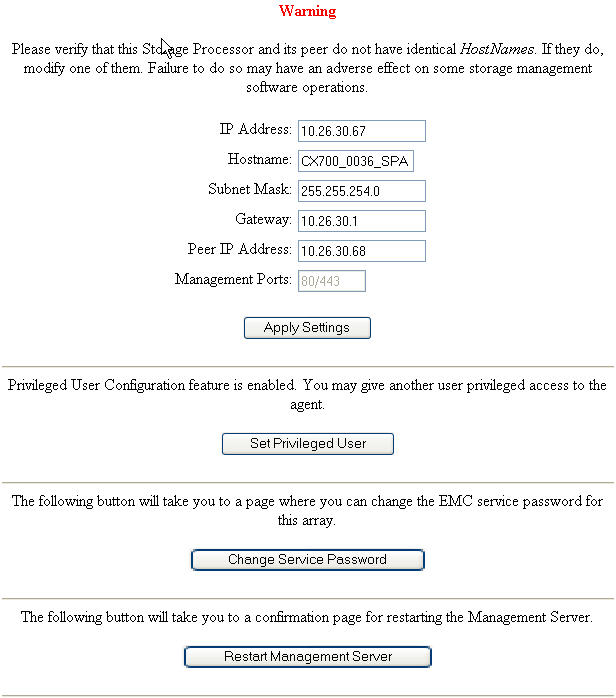
The key to handling this type of failover at a file system level is PowerPath. See PowerPath for instructions on installing this product. Removing Host Agent or CLI (if needed) # /etc/init.d/agent stop # pkgrm NAVIAGENT # pkgrm NAVICLI SP UNMANAGEDWe received an error called "SP 10.70.32.11 Unreachable" in the ECC Console. The storage processor was working - responded to ping, continued servicing I/O, and allowed Navisphere Manager to be loaded. The problem was with the SP being unmanaged as the "SP Agent" had stopped working. The first step is to tresspass LUNs, then try and restart the management server via the original setup window that the EMC Engineer used to configured the SP. In our case it didn't resolve the problem, we needed to remove and re-insert the SP. Open a browser and connect to the SP that has the problem, enter the username and password. https://10.140.128.47/setup You should see a screen similar to the following. Select "Restart Management Server".
ADD LUNSee list of existing LUNs created on the array. # navicli -h spa getlun | grep '^Name' Get a list of raid groups created on the array. # navicli -h spa getrg | grep "RaidGroup ID" For each raid group review the number and placement of LUNs. # navicli -h spa getrg 1 -lunlist For each raid group check the free number of contiguous available space. # navicli -h spa getrg 1 | grep "Free contiguous group of unbound" Bind raid type 1_0, LUN ID 11, raid group 1, read and write cache, SP B, and 30GB. # navicli -h spa bind r1_0 11 -rg 1 -rc 1 -wc 1 -sp b -sq gb -cap 30 Check the state of the LUN, you should see "Binding" state or "Bound" when complete. Check capacity matches. # navicli -h spa getlun 11 | grep State # navicli -h spa getlun 11 | grep "LUN Capacity(Megabytes)" See list of storage groups, luns and hosts. # navicli -h spa storagegroup -list -host Add lun to storage group and check. # navicli -h spa storagegroup -addhlu -gname "Storage Group 4" -hlu 11 -alu 11 # navicli -h spa storagegroup -list -host -gname "Storage Group 4" REMOVE LUNReview this list of LUNs. # navicli -h spa getlun | grep '^Name' List storage groups and find the ALU (storage LUN ID) number. # navicli -h spa storagegroup -list -host Remove LUN from storagegroup. # navicli -h spa storagegroup -removehlu -gname "Storage Group 4" -hlu 11 Unbind LUN from raid group which destroys LUN. # navicli -h spa unbind 11 METALUNExpand LUN 3 using the unassigned (not in any storage group) LUN 11 with concatentation. # java -jar ./navicli.jar -address spa -user admin -password XXXX metalun -expand -base 3 -lus 11 -type c # java -jar ./navicli.jar -address spa -user admin -password XXXX metalun -list Expand LUN 3 using the unassigned (not in any storage group) LUN 13 (equal size) with stripe. # java -jar ./navicli.jar -address spa -user admin -password XXXX metalun -expand -base 3 -lus 11 -type s # java -jar ./navicli.jar -address spa -user admin -password XXXX metalun -list Destroy a metalun LUN 3 that is assigned in Storage Group 4 as hlu 0. # navicli -h spa storagegroup -removehlu -gname "Storage Group 4" -hlu 0 # java -jar ./navicli.jar -address spa -user admin -password admin01! metalun -destroy -metalun 3 RESERVED LUNSUse the following guideline when creating a reserved LUN Pool. Number of Source LUNs = 20GB, 20GB, 40GB, 40GB, 60GB, 100GB Average Source LUN Size = 280GB/6 = 50GB Reserved LUN Size = 5GB (10% COFW factor, of the average LUN size) Number of Reserved LUNS = 6 (based on number of Source LUNs) Create 2x Reserved LUNS = 12 * 5GB (provides 20% COFW overflow factor) Create standards LUNs, however, do not assign them to any storage group. # navicli -h spa bind r1_0 30 -rg 1 -rc 1 -wc 1 -sp a -sq gb -cap 5 # navicli -h spa bind r1_0 31 -rg 1 -rc 1 -wc 1 -sp b -sq gb -cap 5 # navicli -h spa bind r1_0 32 -rg 1 -rc 1 -wc 1 -sp a -sq gb -cap 5 # navicli -h spa bind r1_0 33 -rg 1 -rc 1 -wc 1 -sp b -sq gb -cap 5 # navicli -h spa bind r1_0 34 -rg 1 -rc 1 -wc 1 -sp a -sq gb -cap 5 # navicli -h spa bind r1_0 35 -rg 1 -rc 1 -wc 1 -sp b -sq gb -cap 5 # navicli -h spa bind r1_0 36 -rg 1 -rc 1 -wc 1 -sp a -sq gb -cap 5 # navicli -h spa bind r1_0 37 -rg 1 -rc 1 -wc 1 -sp b -sq gb -cap 5 # navicli -h spa bind r1_0 38 -rg 1 -rc 1 -wc 1 -sp a -sq gb -cap 5 # navicli -h spa bind r1_0 39 -rg 1 -rc 1 -wc 1 -sp b -sq gb -cap 5 # navicli -h spa bind r1_0 40 -rg 1 -rc 1 -wc 1 -sp a -sq gb -cap 5 # navicli -h spa bind r1_0 41 -rg 1 -rc 1 -wc 1 -sp b -sq gb -cap 5 Add LUNs to the Reserved LUN Pool and verify they exist. # navicli -h spa reserved -lunpool -addlun 30 32 34 36 38 40 # navicli -h spa reserved -lunpool -list # navicli -h spb reserved -lunpool -addlun 31 33 35 37 39 41 # navicli -h spb reserved -lunpool -list CREATE SNAPSHOTDetermine ALU LUNs assigned to the production host that you want to take Snapshots from. # navicli -h spa storagegroup -list -host # navicli -h spa storagegroup -list -host -gname "Storage Group 3" Assume the ALU LUNs number returned from the above step are LUN 5 and LUN 7. Determine the current LUN SP owner. # navicli -h spa getlun 5 | grep "Current owner" # navicli -h spa getlun 7 | grep "Current owner" Create Snapshots using these LUNs (5 and 7). The Snapshot needs to be created from the current SP LUN owner. Creating a Snapshot is having a LUN marked as a Source LUN. # navicli -h spb snapview -createsnapshot 5 -snapshotname sap_snap5 # navicli -h spb snapview -createsnapshot 7 -snapshotname sap_snap7 # navicli -h spa snapview -listsnapshots Add Snapshots into the BackUp Host Storage Group # navicli -h spa storagegroup -addsnapshot -gname "Storage Group 1" -snapshotname sap_snap5 # navicli -h spa storagegroup -addsnapshot -gname "Storage Group 1" -snapshotname sap_snap7 # navicli -h spa storagegroup -list -host -gname "Storage Group 1" Flush Secondary Host Buffers # umount /tempA # umount /tempB Start SnapView Sessions from the SP LUN Current owner. Starting a session starts the COFW (copy on first write) tracking mechanism and creates a virtual copy LUN. # navicli -h spb snapview -startsession sap_sess5 -snapshotname sap_snap5 -persistence # navicli -h spb snapview -startsession sap_sess7 -snapshotname sap_snap7 -persistence # navicli -h spa snapview -listsessions -all | grep '^Name' Activate Snapshots (makes Snapshot visible to the secondary host). # navicli -h spb snapview -activatesnapshot sap_sess5 -snapshotname sap_snap5 # navicli -h spb snapview -activatesnapshot sap_sess7 -snapshotname sap_snap7 # navicli -h spa snapview -listsnapshots Mount Snapshots on Backup Host (ensure zoning, host HBA lun masking all effective) # admsnap activate -s sap_sess5 Scanning for new devices. Activated session sap_sess5 on device /dev/rdsk/emcpower7c # admsnap activate -s sap_sess7 Scanning for new devices. Activated session sap_sess7 on device /dev/rdsk/emcpower8c. # fsck -F ufs /dev/rdsk/emcpower7c # fsck -F ufs /dev/rdsk/emcpower8c # mount /dev/dsk/emcpower8c /tempA # mount /dev/dsk/emcpower7c /tempB REMOVE SNAPSHOTDe-Activate Snapshots (makes Snapshot not visible to the secondary host) # admsnap deactivate -s sap_sess5 # admsnap deactivate -s sap_sess7 Stop SnapView Sessions from the SP LUN Current owner. # navicli -h spb snapview -stopsession sap_sess5 # navicli -h spb snapview -stopsession sap_sess7 # navicli -h spa snapview -listsnapshots Remove Snapshots from Storage Groups # navicli -h spa storagegroup -removesnapshot -gname "Storage Group 1" -snapshotname sap_snap5 # navicli -h spa storagegroup -removesnapshot -gname "Storage Group 1" -snapshotname sap_snap7 # navicli -h spa storagegroup -list -host -gname "Storage Group 1" Remove Snapshots from Storage System # navicli -h spb snapview -rmsnapshot -snapshotname sap_snap5 # navicli -h spb snapview -rmsnapshot -snapshotname sap_snap7 # navicli -h spa snapview -listsnapshots ROLLBACK SNAPSHOTThe session must be started with the persistence flag. Secondly, ensure the production host has the file system umount before performing the rollback. # navicli -h spb snapview -startsession sap_sess5 -snapshotname sap_snap5 -persistence # navicli -h spb snapview -activatesnapshot sap_sess5 -snapshotname sap_snap5 # navicli -h spb snapview -startrollback sap_sess5 -rate high # navicli -h spa snapview -listsessions -all List of Target Logical Units: LUN 5 snap Logical Units UID 60:06:01:60:B3:01:15:00:EA:BF:FF:12:B9:8E:DB:11 snap Logical Units Name sap_snap5 Session in simulation: Not supported in this revision. Session in persistence: YES Session creation time: 12/18/06 20:17:39 Session state: Rolling Back List of Target LUN Number: 5 Session Consistent Start: NO Verify roll back completed. # navicli -h spa snapview -listsessions -all | grep "Session state" Session state: Normal CLONESCreate two spare Clone Private LUNS. # navicli -h spa bind r1_0 42 -rg 1 -rc 1 -wc 1 -sp a -sq gb -cap 5 # navicli -h spa bind r1_0 43 -rg 1 -rc 1 -wc 1 -sp a -sq gb -cap 5 Configure the array to use SnapView Clone and Protected Restore feature, either via CMD line or GUI. # java -jar ./navicli.jar -address spa snapview -allocatecpl -spa 42 -spb 43 # java -jar ./navicli.jar -address spa snapview -changeclonefeature -AllowProtectedRestore 1 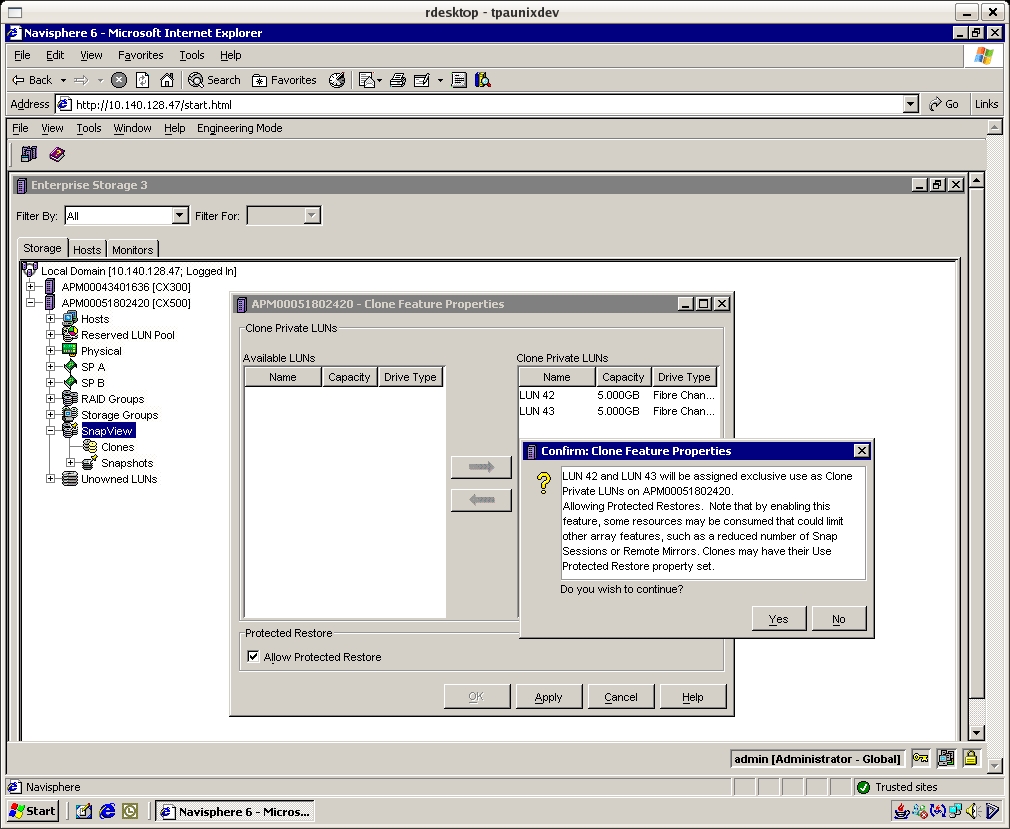
Create a clone LUN of the same size for the LUN you intend to clone. # navicli -h spa bind r1_0 50 -rg 1 -rc 1 -wc 1 -sp a -sq gb -cap 10 # navicli -h spa getlun 50 | grep State Create a Clone Group adding in the source LUN for which the clone will be made. In the Navisphere GUI click SnapView, Create Clone Group. Give the group a name, for example, "cgsap_dev" and add Clone Source LUNs into the group. Then right click on the newly created Clone Group and add the Clone LUN i.e. the one you created in the step above. Select the protected restore option to ensure a gold copy LUN. # java -jar ./navicli.jar -address spa snapview -createclonegroup -Name cgsap_dev -Luns 4 # java -jar ./navicli.jar -address spa snapview -addclone -Name cgsap_dev -Luns 50 -SyncRate high -UseProtectedRestore 1 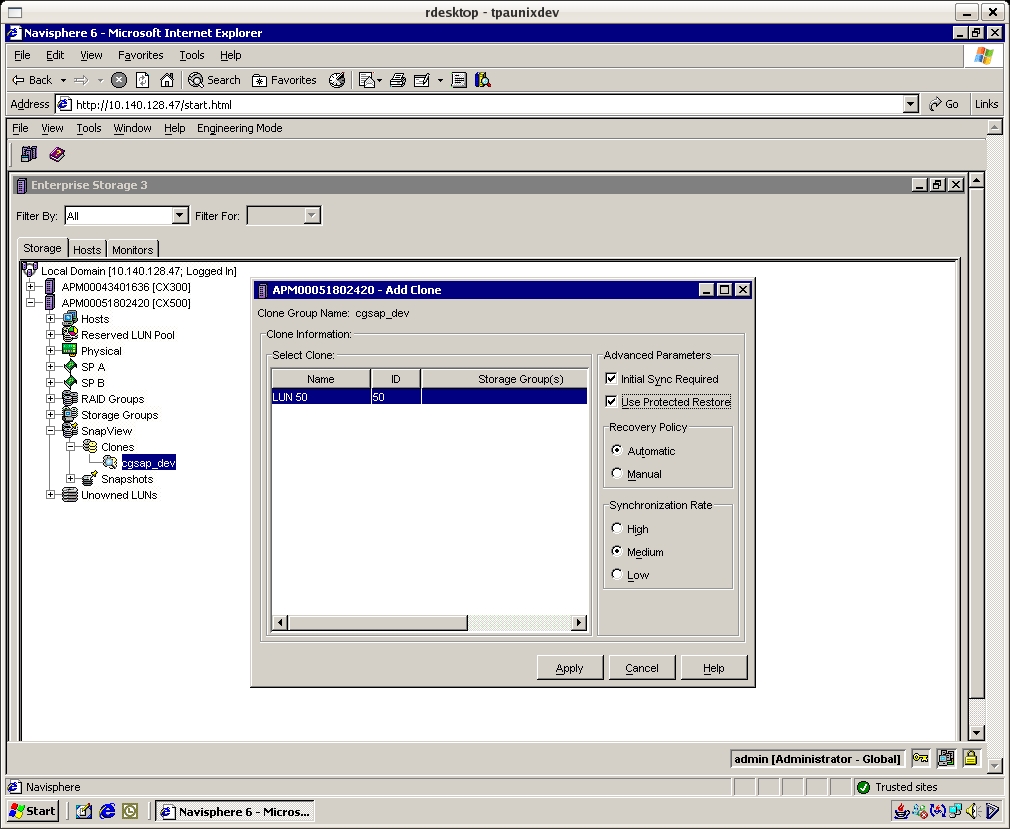
The Clone process will start a first time sync operation. When the sync operation is completed the Clone is ready to be "fractured" and mounted on the backup host. Fracture the clone by right clicking on the Clone and choose Fracture. The clone status will change to "Consistent". It's good idea to ensure the production host buffers are flushed and or no I/O is occuring during before starting the fracture. # java -jar ./navicli.jar -address spa snapview -listclone -Name cgsap_dev # java -jar ./navicli.jar -address spa snapview -fractureclone -CloneId 0100000000000000 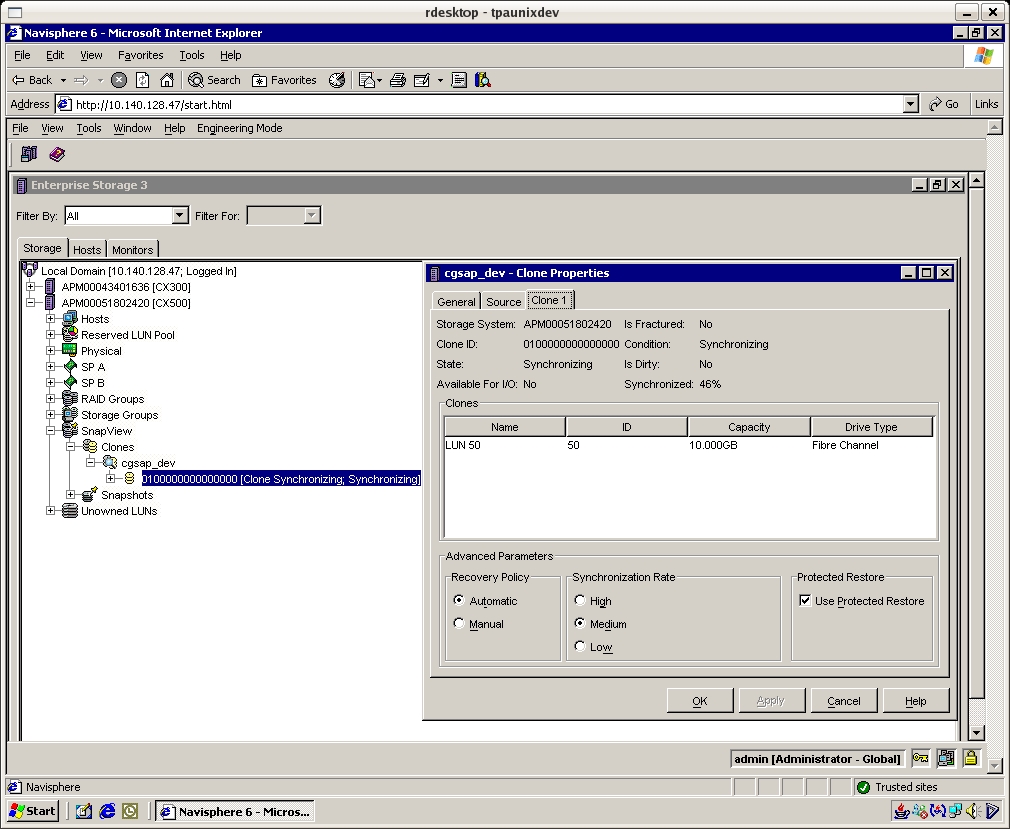
The Clone backup LUN must be added into the Storage Group. Ensure host side HBA LUN masking is applied and that the LUN appears in the format (Solaris) command. # navicli -h spa storagegroup -addhlu -gname "Storage Group 1" -hlu 50 -alu 50 # navicli -h spa storagegroup -list -host -gname "Storage Group 1" # admsnap clone_activate # mount /dev/dsk/c9t1d50s0 /tempA EXCHANGE 2003Exchange uses a term called storage groups (ESG's) that contain databases within them - up to four storage groups with each ESG consisting of one to five databases. There is only one set of log files per ESG. The CLARiion also uses a term called storage groups; we will refer to these as SG. The recommended best practice is to have one ESG per SG and create multiple databases within the ESG in order to have granularity at the database level for maintenance and restores. The database performance is dependent on log file performance. Performance therefore improves by having log operations in parallel, hence we need additional ESGs - our design starts with two ESGs. Exchange 2003 can read from an online database at a maximum rate of 7MB per second. The product performs random reads and writes on the database, with sequential log files access. All I/O are small - 4KB. Power users require 1.0 IOPS, whereas typical users require 0.5 IOPS. To support 5000 uses in terms of I/O performance: 3000*0.5 + 2000*1.0 = 3500 IOPS The 15K rpm drive provides around 150 IOPS; therefore we need approximately 23 disks in the database configuration. Our configuration uses 28 disks for database placement. Exchange on CLARiiON Best Practice Guidelines
The RAID Group numbering is predictable with even LUNs presented on SP A and odd numbered LUNs presented on SP B. The best practice is to balance storage by ensuring each SP owns an equal number of LUNs. For example:
*reserved log file LUN for a third ESG The following table illustrates the layout based on disk positions and usage.
Note: The storage group for MTA/SMTP is located on disks that contain the CX300 internal operating system (FLARE). Specifically, drives 0-4 is used when a hardware fault causes write cache to be disabled. Drives 0-3 also contain the CLARiion operating system (FLARE). Once the system is up and running there is very little activity on these drives. WINDOWS CLUSTERSClustering software requires client navisphere agents to be configured in a special way. What you're aiming for is having one host (clustered virtual name) appear as the registered host on the storage array. Lets assume we have two servers with two HBA's per server. If the cluster and agent configuration is properly configured you will see four HBA's on the storage array with one host name. This virtual host name is the one that forms parts of the storage group. The server that owns the Cluster Group (containing the cluster name and IP address) receives requests from the Navisphere client application, and therefore must be running the Navisphere Host Agent. The second server in the cluster does not currently own the Cluster Group so unless the Cluster Group fails over to this server, it does not need a running Host Agent. To handle the starting and stopping of the proper Host Agent on the servers, you must add a Generic Service resource to the Cluster Group. BAD DISKSReview SP logs for information about failure. # navicli -h $myspa getlog -50 # navicli -h $myspb getlog -50 Check status of customer replaceable units. # navicli -h $myspa getcrus # navicli -h $myspb getcrus Check disk status, assume 0_6_12 is dead and 2_5_10 is hot spare. # navicli -h $myspa getdisk 0_6_12 # navicli -h $myspb getdisk 2_5_10 Start SP collect in preparation for sending to EMC. Then check and retrieve files from SP for FTPing over. # navicli -h $myspa spcollect -messner # navicli -h $myspa managefile -list # navicli -h $myspa managefile -retrieve ALLOCATE STORAGESee our LUN plans below with approx 16 splits per raid group. Raid Group (300GB * 4) RAID 5 ~1073GB RG 50 GB SP 500 50 A 501 50 B 502 50 A 503 50 B 504 50 A 505 50 B 506 50 A 507 50 B 508 50 A 509 23.484 B 3500 100 A 3501 100 B 3502 100 A 3503 100 B 3504 100 A 3505 100 B **3500 (11th Lun) in RG 50, 3000 range for 300GB drives (work around cx lun limit) Raid Group (450GB * 4) RAID 5 ~1600GB. RG 20 GB SP 200 100 A 201 100 B 202 100 A 203 100 B 204 100 A 205 100 B 206 100 A 207 100 B 208 100 A 209 100 B 4200 100 A 4201 100 B 4202 100 A 4203 100 B 4204 100 A 4205 100 B Before creating RAID Groups I use Navisphere to check the new Bus/Enclosure/Disk numbers, plus a visual inspection of the array. navicli -h 2311_spa createrg 72 2_6_1 2_7_1 3_4_1 3_5_1 3_6_1 -rm no -pri high -raidtype r5 navicli -h 2311_spa createrg 73 2_6_2 2_7_2 3_4_2 3_5_2 3_6_2 -rm no -pri high -raidtype r5 navicli -h 2311_spa createrg 74 2_6_3 2_7_3 3_4_3 3_5_3 3_6_3 -rm no -pri high -raidtype r5 navicli -h 2311_spa createrg 75 2_6_4 2_7_4 3_4_4 3_5_4 3_6_4 -rm no -pri high -raidtype r5 navicli -h 2311_spa createrg 76 2_6_5 2_7_5 3_4_5 3_5_5 3_6_5 -rm no -pri high -raidtype r5 navicli -h 2311_spa createrg 77 2_6_6 2_7_6 3_4_6 3_5_6 3_6_6 -rm no -pri high -raidtype r5 navicli -h 2311_spa createrg 78 2_6_7 2_7_7 3_4_7 3_5_7 3_6_7 -rm no -pri high -raidtype r5 navicli -h 2311_spa createrg 79 2_6_8 2_7_8 3_4_8 3_5_8 3_6_8 -rm no -pri high -raidtype r5 navicli -h 2311_spa createrg 80 2_6_9 2_7_9 3_4_9 3_5_9 3_6_9 -rm no -pri high -raidtype r5 navicli -h 2311_spa createrg 81 2_6_10 2_7_10 3_4_10 3_5_10 3_6_10 -rm no -pri high -raidtype r5 navicli -h 2311_spa createrg 82 2_6_11 2_7_11 3_4_11 3_5_11 3_6_11 -rm no -pri high -raidtype r5 navicli -h 2311_spa createrg 83 2_6_12 2_7_12 3_4_12 3_5_12 3_6_12 -rm no -pri high -raidtype r5 navicli -h 2311_spa createrg 84 2_6_13 2_7_13 3_4_13 3_5_13 3_6_13 -rm no -pri high -raidtype r5 navicli -h 2311_spa createrg 85 2_6_14 2_7_14 3_4_14 3_5_14 3_6_14 -rm no -pri high -raidtype r5 Bind Luns. This scripts handles first 10 LUNs.
# cat rg.txt
60
61
62
..

# cat makelun1.sh
for id in `cat rg.txt`
do
echo $id
navicli -h 2311_spa bind r5 ${id}0 -rg ${id} -rc 1 -wc 1 -sp a -sq GB -cap 50
navicli -h 2311_spb bind r5 ${id}1 -rg ${id} -rc 1 -wc 1 -sp b -sq GB -cap 50
navicli -h 2311_spa bind r5 ${id}2 -rg ${id} -rc 1 -wc 1 -sp a -sq GB -cap 50
navicli -h 2311_spb bind r5 ${id}3 -rg ${id} -rc 1 -wc 1 -sp b -sq GB -cap 50
navicli -h 2311_spa bind r5 ${id}4 -rg ${id} -rc 1 -wc 1 -sp a -sq GB -cap 50
navicli -h 2311_spb bind r5 ${id}5 -rg ${id} -rc 1 -wc 1 -sp b -sq GB -cap 50
navicli -h 2311_spa bind r5 ${id}6 -rg ${id} -rc 1 -wc 1 -sp a -sq GB -cap 50
navicli -h 2311_spb bind r5 ${id}7 -rg ${id} -rc 1 -wc 1 -sp b -sq GB -cap 50
navicli -h 2311_spa bind r5 ${id}8 -rg ${id} -rc 1 -wc 1 -sp a -sq GB -cap 50
navicli -h 2311_spb bind r5 ${id}9 -rg ${id} -rc 1 -wc 1 -sp b -sq bc -cap 49248768
done
Bind more LUNs (over 10 in an RG). navicli -h 2311_spa bind r5 3500 -rg 60 -rc 1 -wc 1 -sp a -sq GB -cap 100 navicli -h 2311_spb bind r5 3501 -rg 60 -rc 1 -wc 1 -sp b -sq GB -cap 100 navicli -h 2311_spa bind r5 3502 -rg 60 -rc 1 -wc 1 -sp a -sq GB -cap 100 navicli -h 2311_spb bind r5 3503 -rg 60 -rc 1 -wc 1 -sp b -sq GB -cap 100 navicli -h 2311_spa bind r5 3504 -rg 60 -rc 1 -wc 1 -sp a -sq GB -cap 100 navicli -h 2311_spb bind r5 3505 -rg 60 -rc 1 -wc 1 -sp b -sq GB -cap 100 SNAPSHOT PERFWe had an issue with Snapshot performance. During a Snapshot session the time taken to create a 500MB file would increase from 1 minute to 25 minutes. Interestingly; though when we reviewed the NAR file we only see RAID group performance reach 30% utilization during the snapshot sessions. 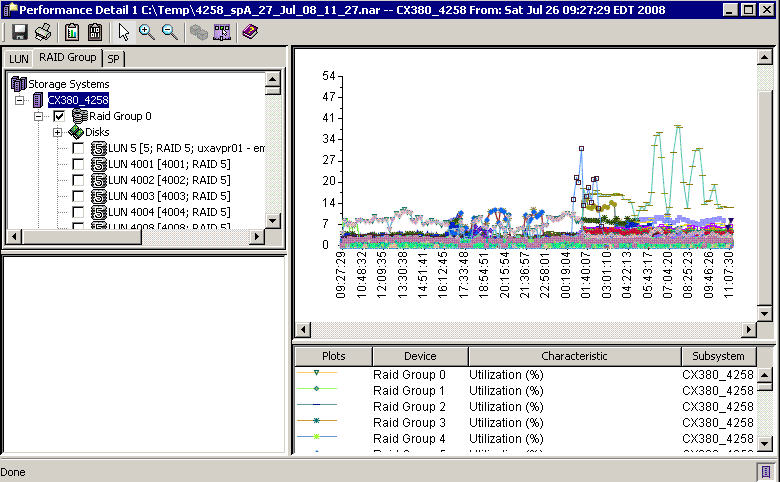
Below is a graph that shows the tremendous amount of Snapshot activity. The tricky part is that Snapshot activity is not represented in RAID Group utilisation. It's a "feature" that causes the EMC performance guys headaches too. From the NAR file you need to select LUNs that have a SnapShot sessions and then graph performance. 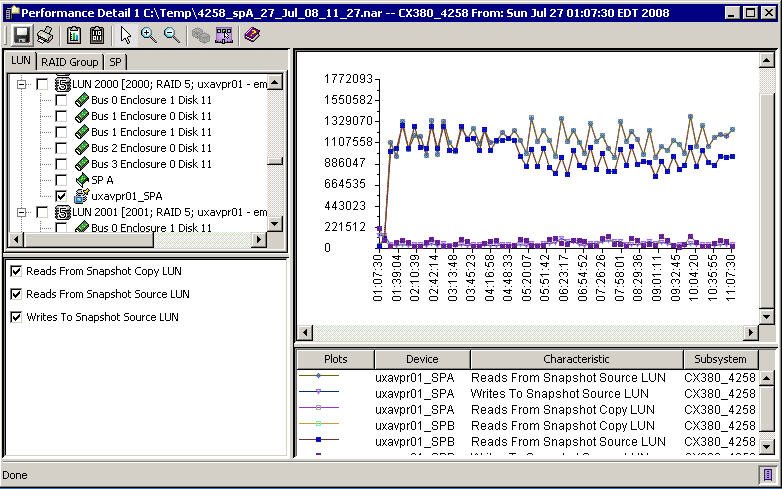
To resolve, we added 2 trays with 300GB drives and created two RAID 10 groups i.e. 14 disks each to give approx ~3.7TB of space for reserved LUNs. Hence we would have 28 dedicated disks for reserved pool. See below for determining the amount of reserved space. Number of Source LUNs uxavpr01 = 47LUNs, 24700GB Average Source LUN Size = 24700GB/47 = 525GB Reserved LUN Size = 50GB (10% COFW factor, of the average LUN size) Number of Reserved LUNS = 47 (based on number of Source LUNs) Create 2x Reserved LUNS = 94 * 50GB (provides 20% COFW overflow factor) = 4.7TB of space need for reserved LUNs GET NARA script for getting NAR files off the CX array.
#!/bin/ksh
#
# Get NAR: David Spink 04/08/08
#
#

# Log start time
echo "====NAR Get Start `date`"
cd /opt/san_1384/nar
#
myDate=`/usr/bin/date +%Y-%m-%d`

# Get NAR
for i in `cat ./myarray.txt`
do
    echo $i
    mv ./${i}_spa.nar ./history/${i}_spa.nar.${myDate} 2> /dev/null
    mv ./${i}_spb.nar ./history/${i}_spb.nar.${myDate} 2> /dev/null
    /opt/Navisphere/bin/naviseccli -h ${i}_spa analyzer -archiveretrieve -file ${i}_spa.nar
    /opt/Navisphere/bin/naviseccli -h ${i}_spb analyzer -archiveretrieve -file ${i}_spb.nar
done
Contents for myarray.txt. 0811 0847 0899 1536 4258 In order to analyze the data on your PC "offline", you must download from EMC Powerlink "NaviSphere Management Server (Off-array version)" and "NaviSphere Analyzer UI (Off-array version)". Located on Powerlink at CS Support, Downloads, NaviSphere, Win Mgmt Station. You install the install the NaviSphere Manager first, and then the NaviSphere Analyzer UI. There is local service called "NaviGovernor Service" which needs to be started before opening Navisphere Manager. Analyzering the NAS files "off array" is much faster. Here are some performance guidelines to keep in mind when reviewing NAR files.
TRESPASSTo identify Trespassed LUNs.
naviseccli -h $myspa getlun -default -owner | awk '
/LOGICAL/	{LUN=$NF}
/Default/	{DEF=$NF}
/Current/	{CUR=$NF;
if (DEF!=CUR) {TRSP=TRSP+1;
printf "%6d %6d %6s %6s \n", TRSP, LUN, DEF, CUR}}
END {print "There are " TRSP " Trespassed LUNs."} '
To clear Trespassed LUNs (3 methods) # navicli -h $myspa trespass mine or # powermt restore or NaviSphere GUI LUNZConfigure the QLogic HBA card to ensure persistent binding. In this example no LUN is assigned hence the default LUNZ is mapped if attaching to a CLARiion Array. See how Qlogic SANsurfer CLI and format shows both LUNs as drive type unkown. In the CLARiion world LUNZ refers to a fake logical LUN in order for the host software to send configuration commands to the array when no actually LUN is available to the host. With Access Logic configured on the CLARiion a host agent communicates with the storage array through either LUNZ or a real LUN. Effectively the output below ensures that once we install the Navisphere Host Agent it will have a path to communicate and register with the CLARiion, without the LUNZ that host agent registration will fail.
# cd /opt/QLogic_Corporation/SANsurferCLI
# ./scli
Main Menu
1:  Display System Information
2:  Display HBA Settings
3:  Display HBA Information
4:  Display Device List
5:  Display LUN List
6:  Configure HBA Settings
7:  Target Persistent Binding
8:  Selective LUNs
9:  Boot Device
10:  Driver Settings
11:  HBA Utilities
12:  Flash Beacon
13:  Diagnostics
14:  Statistics
15:  Display Usage
16:  Quit

Enter Selection: 5


LUN List:  HBA Selection Menu:
1:  Select HBA
2:  Select All HBAs

Enter Selection: 2


LUN Information Menu:
1:  Display Specific LUN Information
2:  Display All LUN(s) Information
3:  Return to HBA Selection Menu

Enter Selection: 2

-----------------------------------------------------------------------------
Device Port Name: 50-06-01-69-30-21-75-56 Port ID: 05-00-00
-----------------------------------------------------------------------------
Product Vendor             : DGC
Product ID                 : LUNZ
Product Revision           : 0219
LUN                        : 0
Size                       : 16444.28 GB
WWULN                      : 50-06-01-60-B0-21-75-56-50-06-01-60-B0-21-75-56
LUN OS Name                : /dev/dsk/c3t2d0

-----------------------------------------------------------------------------
Device Port Name: 50-06-01-61-30-21-75-56 Port ID: 05-01-00
-----------------------------------------------------------------------------
Product Vendor             : DGC
Product ID                 : LUNZ
Product Revision           : 0219
LUN                        : 0
Size                       : 16444.28 GB
WWULN                      : 50-06-01-60-B0-21-75-56-50-06-01-60-B0-21-75-56
LUN OS Name                : /dev/dsk/c3t0d0

# format
AVAILABLE DISK SELECTIONS:
       0. c1t0d0 SUN72G cyl 14087 alt 2 hd 24 sec 424
          /pci@1f,700000/scsi@2/sd@0,0
       1. c1t1d0 SUN72G cyl 14087 alt 2 hd 24 sec 424
          /pci@1f,700000/scsi@2/sd@1,0
       2. c3t0d0 drive type unknown
          /pci@1d,700000/fibre-channel@1/sd@0,0
       3. c3t0d0 drive type unknown
          /pci@1d,700000/fibre-channel@1/sd@0,0
Below is an example of a host with NaviSphere Agent installed and a LUN mapped via NaviSphere manager. At this stage PowerPath is not installed and we are illustrating how after a LUN is mapped the LUNZ default is removed.
# cd /opt/QLogic_Corporation/SANsurferCLI
# ./scli
-----------------------------------------------------------------------------
Device Port Name: 50-06-01-69-30-21-75-56 Port ID: 05-00-00
-----------------------------------------------------------------------------
Product Vendor             : DGC
Product ID                 : RAID 10
Product Revision           : 0219
LUN                        : 0
Size                       : 120.00 GB
WWULN                      : 60-06-01-60-99-00-15-00-7A-37-FE-86-06-73-DA-11
LUN OS Name                : /dev/dsk/c3t2d0

-----------------------------------------------------------------------------
Device Port Name: 50-06-01-61-30-21-75-56 Port ID: 05-01-00
-----------------------------------------------------------------------------
Product Vendor             : DGC
Product ID                 : RAID 10
Product Revision           : 0219
LUN                        : 0
Size                       : 120.00 GB
WWULN                      : 60-06-01-60-99-00-15-00-7A-37-FE-86-06-73-DA-11
LUN OS Name                : /dev/dsk/c3t0d0

# format
AVAILABLE DISK SELECTIONS:
       0. c1t0d0 SUN72G cyl 14087 alt 2 hd 24 sec 424
          /pci@1f,700000/scsi@2/sd@0,0
       1. c1t1d0 SUN72G cyl 14087 alt 2 hd 24 sec 424
          /pci@1f,700000/scsi@2/sd@1,0
       2. c3t0d0 drive type unknown
          /pci@1d,700000/fibre-channel@1/sd@0,0
       3. c3t2d0 DGC-RAID10-0219 cyl 61438 alt 2 hd 256 sec 16
          /pci@1d,700000/fibre-channel@1/sd@2,0

# vxdisk list
DEVICE       TYPE            DISK         GROUP        STATUS
c1t0d0s2     auto:sliced     rootdisk     rootdg       online
c1t1d0s2     auto:sliced     rootmirror   rootdg       online
c3t0d0s2     auto            -            -            error

# vxdctl enable
# vxdisk list
DEVICE       TYPE            DISK         GROUP        STATUS
c1t0d0s2     auto:sliced     rootdisk     rootdg       online
c1t1d0s2     auto:sliced     rootmirror   rootdg       online
c3t2d0s2     auto:cdsdisk    -            -            online
CACHETo change read cache on SP A, disable, set (in MB) and enable. navicli -h 0899_spa setcache -rca 0 navicli -h 0899_spa setcache -rsza 3656 navicli -h 0899_spa setcache -rca 1 To change read cache on SP B, disable, set (in MB) and enable. navicli -h 0899_spb setcache -rcb 0 navicli -h 0899_spb setcache -rszb 3656 navicli -h 0899_spb setcache -rcb 1 UPGRADESPre and Post check list below. Note, for systems without PowerPath e.g. Celerra, Linux ensure no trespassed LUNs exist after the code upgrade. 1. Trespassed LUNs 2. Host server connections 3. Array faults 4. Cache settings 5. Pre code version 6. Logs files 7. SP util% | ||||||||||||||||||||||||||||||||||||||||||||||||||||||||||||||||||||||||||||||||||||||||||||||||||||||||||||||||||||||||||||||||||