dave spink toolset
|
|
dave spink toolset |
|
|
ZFS APPLIANCE TASKS: |
|||
| INSTALL | AD INTEG | SMB | AUTOHOME |
| ANALYTICS | RESET | LACP | NMI |
| BUNDLES | LDAP | SIZE CALC | UPGRADE |
| FCP | dNFS | QUOTAS | SCRIPTS |
| REPLICATE | SHADOW MIGRATION | COMMANDS | |
INSTALLTo prepare for the ZFSSA install you need the following:
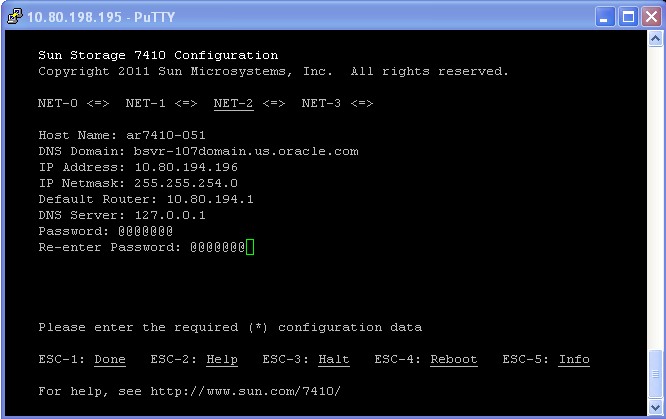
Serial connection to iLOM
Set iLOM IP address & Start Console # set /SP/network pendingipdiscovery=static pendingipaddress=nnn.nn.nn.nn pendingipgateway=nnn.nn.nn.nn pendingipnetmask=nnn.nn.nn.nn commitpending=true # show /SP/network # start SP/console When the appliance initially boots you will be prompted for some basic network settings.
Open a web browser to the URL with the IP address (for example, https://192.168.56.101:215/) to complete appliance configuration; cluster, DNS, NTP, AD or LDAP, and create a storage pool. It's very straight forward. SSH Keys # ssh-keygen -t rsa # cat .ssh/id_rsa.pub Paste the key into ZFSSA - configuration, preferences, add SSH keys ssh root@10.145.76.154 AD INTEGRATIONWhen a filesystem is shared using CIFS, the client clocks must be synchronized to within 5 minutes to avoid user authentication errors. Therefore confirm NTP is working. The appliance needs to find the Domain Controller DNS SRV (service) records. If you use AD as your DNS server then everything is configured by default. See this Microsoft article for more details Verifying Your Basic DNS Configuration
# nslookup
> server 10.80.16.1
> set type=SRV
> _ldap._tcp.tmhol.com

_ldap._tcp.tmhol.com    SRV service location:
          priority       = 0
          weight         = 100
          port           = 389
          svr hostname   = tm-sfx4200-b.tmhol.com
_ldap._tcp.tmhol.com    SRV service location:
          priority       = 0
          weight         = 100
          port           = 389
          svr hostname   = tm-sfx4200-a.tmhol.com
tm-sfx4200-b.tmhol.com  internet address = 10.80.16.193
tm-sfx4200-a.tmhol.com  internet address = 192.168.56.1
Check the AllowLegacySrvCall is configured.
In Storage Server web interface:
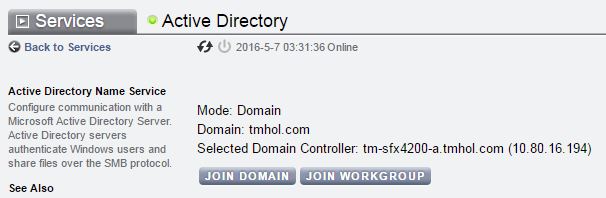
Joining AD via ZFSSA CLI: configuration services smb configuration services smb> set ads_site=tmhol configuration services smb> set pdc=10.80.16.194 configuration services smb> commit configuration services smb> show configuration services ad configuration services ad> domain configuration services ad domain> set domain=tmhol.com configuration services ad domain> set user=Administrator configuration services ad domain> set password=******* configuration services ad domain> set searchdomain=tmhol.com configuration services ad domain> commit configuration services ad domain> done configuration services ad> show
The Active Directory service is modified by joining a domain or a workgroup, rather than directly starting the service. Once the computer account is created (via domain joining) users can map shares. The appliance will then validate Windows users with the domain controller.
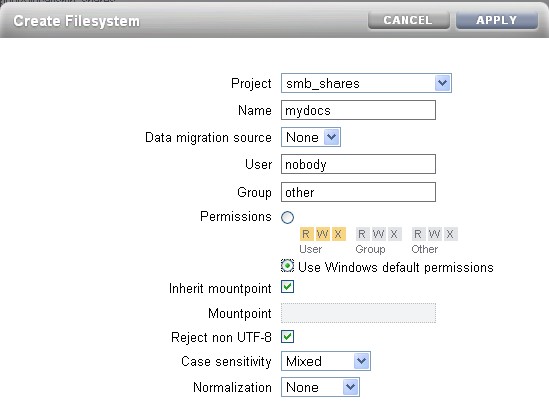
SMBWindows has two layers of permissions - share level and file level. The most restrictive permission is enforced; hence it can be tricky to align both. A best practice is to control ACLs from the filesystem level and not the share level. To simplify management of the appliance, it is recommended to set both the share level and filesystem level to full control for everyone and then manage the individual permissions from a Windows client. Create File System, select "Use Windows Default Permissions".
Set Share Level ACL via file system, protocol tab.
Set File Level ACL via file system, access tab, root directory access.
Check Resource "on" is via project, protocols. This is required to publish the share.
Optional - Assign prefix to differentiate each project's share from one another e.g. \\servername\prefix_filesystem).
Check the published SMB resource via shares, protocol tab.
To manage ZFSSA shares from Microsoft launch mmc.exe, select File>Add/Remove Snap-in. Add "Shared Folders" to the selected snap-ins. Enter in the host FQND you want to manage. You can then manage the share and ACL permissions, as per a standard windows server. AUTOHOMEThe SMB autohome map provides a means to automatically share a directory when a user connects and unshare it when the user disconnects. First, set autohome via SMB service on ZFSSA.
Set ZFSSA Share Level ACL and File Level ACL for administrator and everyone (read & execute)
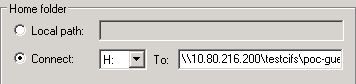
As administrator map drive and create the home directories. Grant the individual user access to their home directory.
Set home directory on Active Directory.
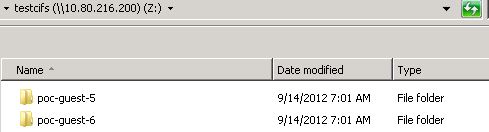
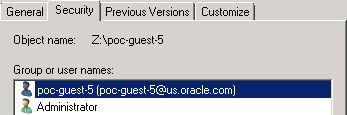
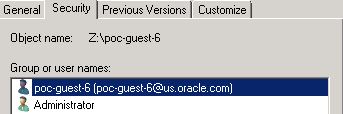
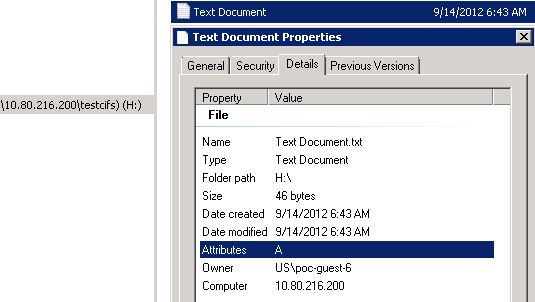
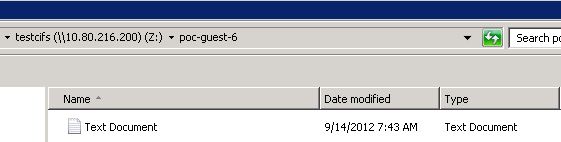
See example, when poc-guest-6 logs onto the Windows Computer the home directory is automapped. Create a file.
Via administrator check to confirm the file created was under the auto_home directory.
ANALYTICSTo retrieve a worksheet (and its belonging datasets) do as follows:
Interface Stats via CLI
oscn2:analytics datasets> select dataset-042

oscn2:analytics dataset-042> show
Properties:
                          name = nic.kilobytes[device]
                      grouping = Network
                   explanation = device bytes per second broken down by device
                        incore = 1.84M
                          size = 74.0M
                     suspended = false
                      activity = none

oscn2:analytics dataset-042> read 2
DATE/TIME                KB/SEC     KB/SEC BREAKDOWN
2012-10-3 15:26:01           70         70 nge1
2012-10-3 15:26:02          159        150 nge3
                                         7 nge1
                                         1 nge2
                                         1 nge0
FACTORY RESETNote you must unconfigure the cluster before issuing a factory reset. # maintenance system factoryreset Alternatively, via the iLOM and Grub Menu.
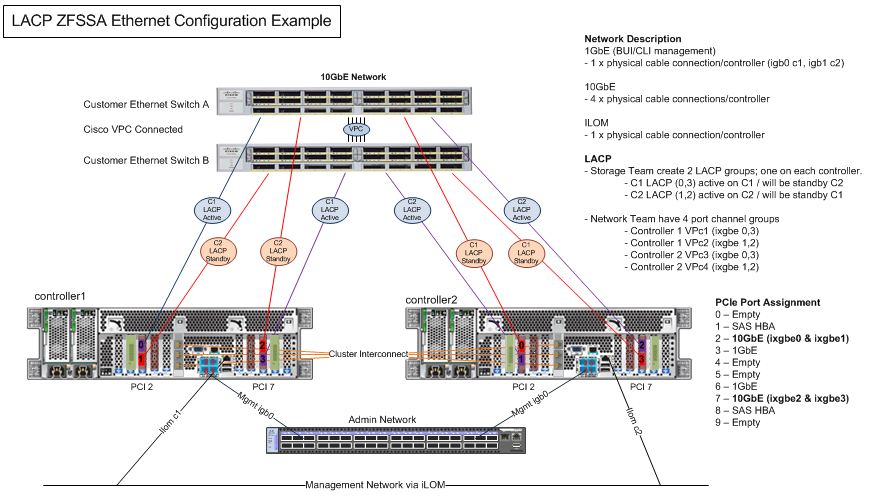
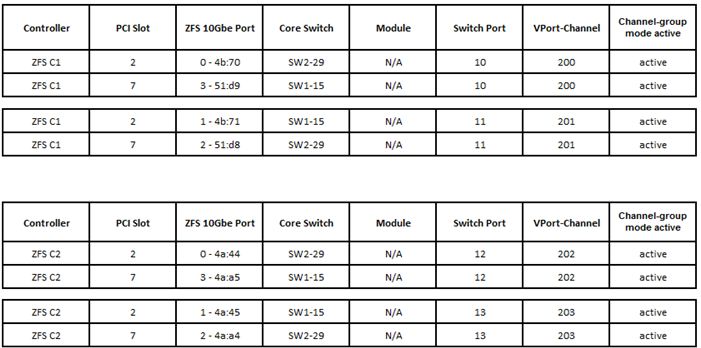
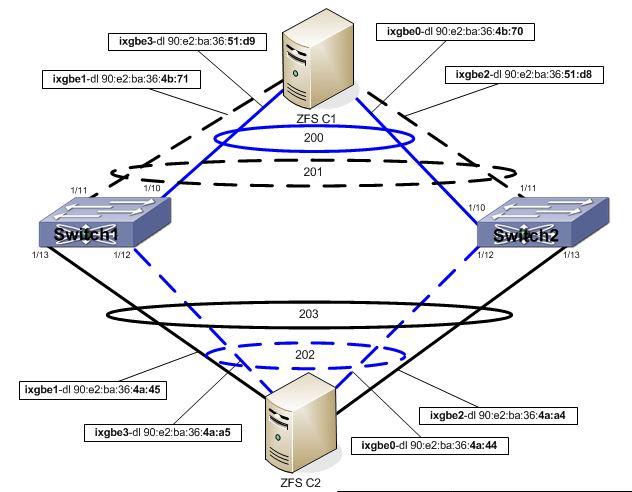
LACPSee below for a configuration Visio of ZFSSA with Cisco VPC.
Cisco VPC Configuration for Switch 1 interface Ethernet1/10 description LABFSTZFSJ00H-VPC switchport access vlan 502 channel-group 200 mode active interface Ethernet1/11 description LABFSTZFSJ00H-VPC switchport access vlan 502 channel-group 201 mode active interface Ethernet1/12 description LABFSTZFSJ00J-VPC switchport access vlan 502 channel-group 202 mode active interface Ethernet1/13 description LABFSTZFSJ00J-VPC switchport access vlan 502 channel-group 203 mode active interface port-channel200 description LABFSTZFSJ00H-VPC switchport access vlan 502 spanning-tree port type edge speed 10000 vpc 200 interface port-channel201 description LABFSTZFSJ00H-VPC switchport access vlan 502 speed 10000 vpc 201 interface port-channel202 description LABFSTZFSJ00J-VPC switchport access vlan 502 spanning-tree port type edge speed 10000 vpc 202 interface port-channel203 description LABFSTZFSJ00J-VPC switchport access vlan 502 speed 10000 vpc 203 Switch1# sho port-channel summary [...] 200 Po200(SU) Eth LACP Eth1/10(P) 201 Po201(SU) Eth LACP Eth1/11(P) 202 Po202(SU) Eth LACP Eth1/12(P) 203 Po203(SU) Eth LACP Eth1/13(P) Switch1# sho vpc [...] vPC status ---------------------------------------------------------------------------- id Port Status Consistency Reason Active vlans ------ ----------- ------ ----------- -------------------------- ----------- 200 Po200 up success success 502 201 Po201 up success success 502 202 Po202 up success success 502 203 Po203 up success success 502 Cisco VPC Configuration for Switch 2
interface Ethernet1/10
  description LABFSTZFSJ00H-VPC
  switchport access vlan 502
  channel-group 200 mode active

interface Ethernet1/11
  description LABFSTZFSJ00H-VPC
  switchport access vlan 502
  channel-group 201 mode active

interface Ethernet1/12
  description LABFSTZFSJ00J-VPC
  switchport access vlan 502
  channel-group 202 mode active

interface Ethernet1/13
  description LABFSTZFSJ00J-VPC
  switchport access vlan 502
  channel-group 203 mode active

interface port-channel200
  description LABFSTZFSJ00H-VPC
  switchport access vlan 502
  spanning-tree port type edge
  speed 10000
  vpc 200

interface port-channel201
  description LABFSTZFSJ00H-VPC
  switchport access vlan 502
  speed 10000
  vpc 201

interface port-channel202
  description LABFSTZFSJ00J-VPC
  switchport access vlan 502
  spanning-tree port type edge
  speed 10000
  vpc 202

interface port-channel203
  description LABFSTZFSJ00J-VPC
  switchport access vlan 502
  speed 10000
  vpc 203

Switch2# sho port-channel summary
[...]
Group Port-       Type     Protocol  Member Ports
      Channel
--------------------------------------------------------------------------------
200   Po200(SU)   Eth      LACP      Eth1/10(P)
201   Po201(SU)   Eth      LACP      Eth1/11(P)
202   Po202(SU)   Eth      LACP      Eth1/12(P)
203   Po203(SU)   Eth      LACP      Eth1/13(P)

Switch2# sho vpc
[...]
vPC status
----------------------------------------------------------------------------
id     Port        Status Consistency Reason                     Active vlans
------ ----------- ------ ----------- -------------------------- -----------
200    Po200       up     success     success                    502
201    Po201       up     success     success                    502
202    Po202       up     success     success                    502
203    Po203       up     success     success                    502
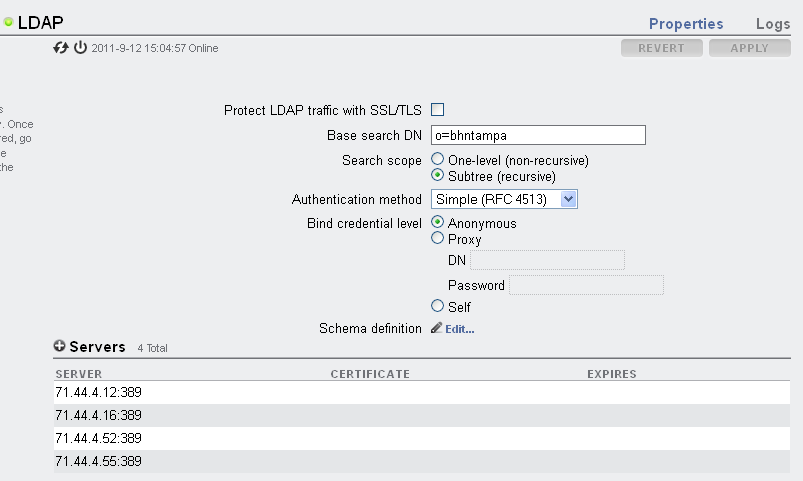
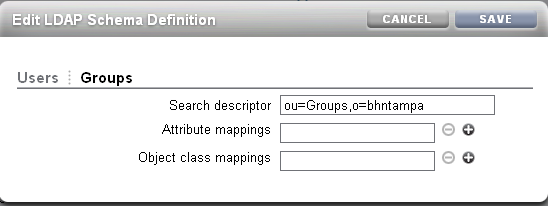
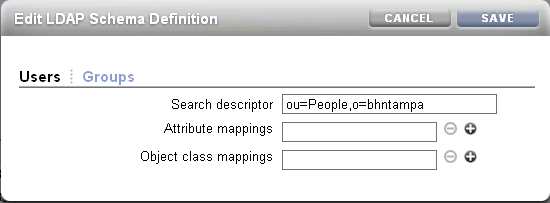
Ping and Jumbo Frames Almost all ping implementations do not account for the overhead of 28 bytes used, so the packet size to specify for ping is the MTU size -28, which is 8972 when testing for an MTU size of 9000. For Oracle Solaris, use: ping -D -s 8972 ipaddress For Linux, use: ping -M do -s 8972 ipaddress For Microsoft Windows Server 2003 use:1 ping -f -l 8972 ipaddress In ESX shell, use: vmkping -s 8972 ipaddress # ping -f -l 9000 192.168.20.246 Pinging 192.168.20.246 with 9000 bytes of data: Packet needs to be fragmented but DF set. Packet needs to be fragmented but DF set. Packet needs to be fragmented but DF set. # ping -f -l 8972 192.168.20.246 Pinging 192.168.20.246 with 8972 bytes of data: NMIThe NMI (non-masked interrupt) is like running a Stop+A i.e. it crashes systen and produces a kernel core dump. Only perform this task if directed to by support. One method is to use a paper clip to access the NMI button. Attached is an image of the ZFSSA 7420. See MOS note ID 1173064.1 for the NMI location for all ZFSSA appliance models. -> cd /HOST/ -> set generate_host_nmi=true The console session should report something similar to the following after you "start /SP/console": panic[cpu2]/thread=ffffff001eccbc60: NMI received ffffff001eccbac0 pcplusmp:apic_nmi_intr+7c () ffffff001eccbaf0 unix:av_dispatch_nmivect+30 () ffffff001eccbb00 unix:nmiint+154 () ffffff001eccbbf0 unix:mach_cpu_idle+b () ffffff001eccbc20 unix:cpu_idle+c2 () ffffff001eccbc40 unix:idle+114 () ffffff001eccbc50 unix:thread_start+8 () syncing file systems... done dumping to /dev/zvol/dsk/system/dump, offset 65536, content: kernel + curproc 100% done: 356267 pages dumped, compression ratio 3.84, dump succeeded During the next boot after the NMI the kernel crash gets written from the dump device into the root filesystem. You should have support verify this tasks completes before generating a support bundle. The first support bundle captures the dump and uploads it to Oracle. Once its uploaded successfully, the dump gets deleted in order to save space. BUNDLESYou can create a bundle via BUI, maintenance system sendbundle, and or akbundle -u. To find the uploaded bundle log onto cores sites with your username and LDAP password. Log in to cores3 (e.g. amogg0010.us.oracle.com, amogg0023.us.oracle.com) # ssh amogg0010.us.oracle.com # cd /cores_data/supportfiles/cores/incoming If not in the above location check the SR case directory. # cd /cores # ls -l 3-5455110901 # acl grant 3-5455110901 # cd 3-5455110901 Or try find the SR as: # findfile 3-11205636803 Running cfmagent to get access to and extract data for SR 3-11205636803 To revert to cores3 mode run: findfile -o ... Command used: /usr/cfmagent/cfmagent -x SR 3-11205636803 /cfm-isde/isde/SR/3-11205636803/ cd /sr/3-11205636803 LDAP INTEGRATIONSee screen shots below.
SIZE CALCRyan Matthew created a size calc tool for ZFSSA. See Ryan Blog for more details Size Calc Tool. Example for a pool of 300G drives, then adding another shelf of 600GB drives. ./sizecalc-sas.py -n -v labzfs *** size 300G 24 add size 600G 24 To remove the stict mode. ./sizecalc-sas.py -s -n -v labzfs *** size 3t 11 UPGRADETo Download Software from the My Oracle Support Release Updates Page.
Upgrade Procedure - note, first check there is no hardware problems before upgrading.
See below for CLI method to upgrade the appliance. Note, you need bundled stored on webserver. > maintenance system updates> list > maintenance system updates> select ak-nas@2009.09.01.2.0,1-1.6 > maintenance system updates ak-nas@2009.09.01.2.0,1-1.6> get > maintenance system updates ak-nas@2009.09.01.2.0,1-1.6> upgrade FCPCheck Host FCP details, for example, if running Solaris as guest OS use these commands. # cfgadm -al # fcinfo hba-port HBA Port WWN: 21000024ff4633c0 HBA Port WWN: 21000024ff3de7f2 Configure zones aliases. For example: t5-c0 21000024ff4633c0 switchA t5-f2 21000024ff3de7f2 switchB z1-8a 21000024FF3E198A switchA z1-8b 21000024FF3E198B switchB z2-2a 21000024FF3E192A switchA z2-2b 21000024FF3E192B switchB Configure zones - one initator with one target per zone. Hence 4 zones: t5-c0 z1-8a t5-c0 z2-2a t5-f2 z1-8b t5-f2 z2-2b On ZFSSA all four target ports need to configured in the same target group for failover. Configure one node, then move to the other node and add FC ports into same target group.
Host initiator ports zoned will automatically appear; you can provide an alias for the HBA. Create host initiator group on one controller, and check the other controller receives the group.
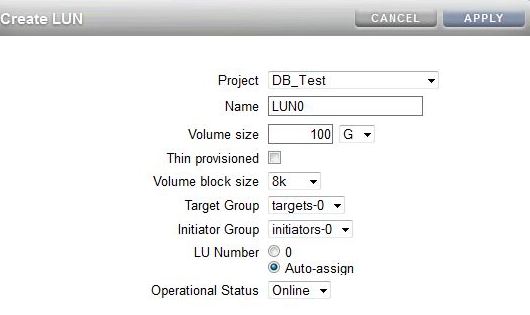
Create a LUN and enter the right target and initiator group. See example below.
Confirm HBA sees ZFSSA target disks # cfgadm -al c15 fc-fabric connected configured unknown c15::21000024ff3e192b disk connected configured unknown c15::21000024ff3e198b disk connected configured unknown c17 fc-fabric connected configured unknown c17::21000024ff3e192a disk connected configured unknown c17::21000024ff3e198a disk connected configured unknown Enable MPxIO # stmsboot -D fp -e WARNING: This operation will require a reboot. Do you want to continue ? [y/n] (default: y) y The changes will come into effect after rebooting the system. Reboot the system now ? [y/n] (default: y) y updating /platform/sun4v/boot_archive rebooting... Check disks are visible. # stmsboot -L Confirm discovered LUNs (we created 3 LUNs)
# luxadm probe | grep -v 500a | grep -v c0t60A
Found Fibre Channel device(s):
  Node WWN:20000024ff3e198a  Device Type:Disk device
    Logical Path:/dev/rdsk/c0t600144F0DE6C029B00005283B4280001d0s2
Validate ALUA
# luxadm display /dev/rdsk/c0t600144F0DE6C029B00005283B4280001d0s2
   Controller           /devices/pci@440/pci@1/pci@0/pci@e/SUNW,qlc@0/fp@0,0
    Device Address              21000024ff3e198a,0
    Host controller port WWN    21000024ff4633c0
    Class                       primary
    State                       ONLINE
   Controller           /devices/pci@440/pci@1/pci@0/pci@e/SUNW,qlc@0/fp@0,0
    Device Address              21000024ff3e192a,0
    Host controller port WWN    21000024ff4633c0
    Class                       secondary
    State                       STANDBY
   Controller           /devices/pci@480/pci@1/pci@0/pci@a/SUNW,qlc@0/fp@0,0
    Device Address              21000024ff3e198b,0
    Host controller port WWN    21000024ff3de7f2
    Class                       primary
    State                       ONLINE
   Controller           /devices/pci@480/pci@1/pci@0/pci@a/SUNW,qlc@0/fp@0,0
    Device Address              21000024ff3e192b,0
    Host controller port WWN    21000024ff3de7f2
    Class                       secondary
    State                       STANDBY
Use format and align each ZFSSA partition by changing the start sector to 256 for each ZFSSA LUN. # format AVAILABLE DISK SELECTIONS: 0. c0t60A9800037535475522B444E6B4B524Cd0 1. c0t60A9800037535478322B444E58577342d0 2. c0t600144F0DE6C029B00005283B4280001d0 SUN-ZFS Storage 7420-1.0-5.00TB disk> 2 partition> 0 Part Tag Flag First Sector Size Last Sector 0 usr wm 34 5.00TB 10737401822 Enter partition id tag[usr]: Enter partition permission flags[wm]: Enter new starting Sector[34]: 256 Enter partition size[10737401789b, 10737402044e, 5242871mb, 5119gb, 4tb]: 4.8tb partition> label Ready to label disk, continue? y Create ZFS file systems on the server
# echo | format | grep -i ZFS
       2. c0t600144F0DE6C029B00005283B4280001d0 SUN-ZFS Storage 7420-1.0-5.00TB 8K

# zpool create test8k c0t600144F0DE6C029B00005283B4280001d0

# df -h | grep test
test8k                 4.9T    31K   4.9T     1%    /test8k
Check status.
# zpool status test8k
  pool: test8k
 state: ONLINE
config:
        NAME                                     STATE     READ WRITE CKSUM
        test8k                                   ONLINE       0     0     0
          c0t600144F0DE6C029B00005283B4280001d0  ONLINE       0     0     0
dNFSTo enable dNFS $ cd $ORACLE_HOME/lib $ mv libodm11.so libodm11.so_bak $ ln -s libnfsodm11.so libodm11.so $ ls -l libodm11.so lrwxrwxrwx 1 oracle oinstall 14 Dec 5 09:57 libodm11.so -> libnfsodm11.so To verify dNFS enabled search for "Oracle Direct NFS ODM Library Version" $ grep ODM alert.log Connect to DB instance and move existing datafiles to NFS drive or create tablespace on NFS drive to check DNFS is working or not. SQL> select * from v$dnfs_servers; ID SVRNAME DIRNAME MNTPORT NFSPORT WTMAX RTMAX 1 10.177.52.158 /oraclenfs 700 2049 0 0 QUOTASThe file below is using a project name called "default" and I'm setting a 15G limit on the share "test" for user root. I simply create my file and parse the contents via SSH. 
Let say I've a hundred users to apply the quota too. One method is to build the file as shown below. 
Then vi the file (mytest.txt) an insert the file t.t; hence the parse file becomes. 
Then parse the file. 
See how quotas are assigned for all users above. (two in my example) SCRIPTSThe text files I parse into SSH i.e. ssh davids@zfsabc < auto-network-mgnt.txt Management Port Label # cat auto-network-mgnt.txt cd / configuration net datalinks select e1000g0 set label=mgnt commit cd / configuration net interfaces select e1000g0 set label=mgnt commit Network Datalinks cd / configuration net datalinks device set label=igb1 set links=datalink commit show Network vNICS # cat auto-network-vnic.txt cd / configuration net datalinks vnic set label=vnic1 set links=e1000g0 commit cd / configuration net interfaces ip set label=10g-data1 set v4addrs=10.246.142.8/27 set links=vnic1 commit Network Routes # cat auto-routes.txt cd / configuration net routing set multihoming=adaptive commit cd / configuration net routing create set family=IPv4 set destination=0.0.0.0 set mask=0 set gateway=192.168.94.11 set interface=e1000g0 commit cd / configuration net routing create set family=IPv4 set destination=10.246.138.0 set mask=24 set gateway=10.246.142.1 set interface=vnic1 commit Preferences cd / configuration preferences set advanced_analytics=true commit Services # cat auto-services.txt configuration services iscsi disable configuration services smb disable configuration services ftp disable configuration services ndmp disable configuration services http disable configuration services replication disable configuration services dynrouting disable configuration services nfs set nfsd_servers=1000 commit cd / configuration preferences set advanced_analytics=true commit Role Authorisations cd / configuration roles oracle authorizations create set scope=nas set allow_takeSnap=true ls Create Alert Threshold # cat auto-threshold-create.txt configuration alerts thresholds create set statname=cpu.utilization set limit=90 set minpost=300 set frequency=300 set minclear=300 commit list Create Alert Action $ cat auto-threshold-actionA.sh #!/usr/bin/ksh # script requires threshold uuid to be passed in # Create alert action for a threshold uuid ssh -T $ZFS1 << EOF configuration alerts actions create set category=thresholds set thresholdid=$1 commit list EOF Configure Alert Action $ cat auto-threshold-actionB.sh #!/usr/bin/ksh # script requires action ID to be passed in # Configure action parameters ssh -T $ZFS1 << EOF configuration alerts actions select $1 action set handler=email set address=david.spink@oracle.com set subject="zfs threhold" commit list EOF Snapshots
# cat auto-snap.sh

#!/usr/bin/ksh
# Create a snapshot
DATE=$(date +"%Y%m%d%H%M")

# check parameters are passed
if [ $# != 3 ]; then
  echo
  echo "Usage: $0 pool project share"
  echo
  echo "Example: $0 test na7 node01-image"
  echo
  exit
fi

# Take a snapshot
ssh -T $ZFS1 << EOF
shares set pool=$1
shares select $2 select $3 snapshots snapshot $2_snap1_${DATE}
cd /
shares select $2 select $3 snapshots list
EOF
Clone a snapshot # cat auto-snapclone.sh #!/usr/bin/ksh # # Clone a snapshot # ZFS1=192.168.94.11 # check parameters are passed if [ $# != 4 ]; then echo echo "Usage: $0 project share snaphot-name clone-name " echo echo "Example: $0 na7 node01-iamge na7_snap1_201607122300 abc" echo exit fi # Clone the snapshot ssh -T $ZFS1 << EOF shares select $1 select $2 snapshots select $3 clone $4 commit list EOF Analytics # cat auto-analytics.txt cd / analytics datasets select name="smb2.ops[op]" set suspended=true commit cd .. select name="smb2.ops" set suspended=true commit cd .. select name="smb.ops[op]" set suspended=true commit cd .. select name="smb.ops" set suspended=true commit cd .. select name="sftp.kilobytes" set suspended=true commit cd .. select name="nfs2.ops" set suspended=true commit cd .. select name="nfs2.ops[op]" set suspended=true commit cd .. select name="ndmp.diskkb" set suspended=true commit cd .. select name="iscsi.ops" set suspended=true commit cd .. select name="iscsi.bytes" set suspended=true commit cd .. select name="http.reqs" set suspended=true commit cd .. select name="ftp.kilobytes" set suspended=true commit cd .. select name="fc.ops" set suspended=true commit cd .. select name="fc.bytes" set suspended=true commit cd .. cd / analytics settings set retain_second_data=1440 set retain_minute_data=4320 set retain_hour_data=8640 commit Encryption # cat auto-encrypt.txt cd / shares encryption local set master_passphrase=abc123 commit cd / shares encryption local keys create set keyname=db commit Shares
# cat auto-shares.sh
for i in {1..5};
do
cat <<EOT>> shares.txt
shares project zspink$i
set quota=20g
set mountpoint=/export/zspink$i
set atime=false
set compression=lzjb
set logbias=latency
set recordsize=128K
set default_user=1000
set default_group=1003
set default_permissions=775
set sharenfs="sec=sys,rw=@172.16.7.192/32:@10.80.54.45/32,root=@172.16.7.192/32:@10.80.54.45/32"
set snapdir=visible
commit
cd /
shares select zspink$i
filesystem fs$i
commit
cd /
EOT
done

# ssh dave@zfs1 < shares.txt
> confirm shares destroy zspink1
REPLICATEList Targets > shares replication targets list TARGET LABEL ACTIONS target-000 7120-B 15 target-001 local 0 Replicate Project # cat source-repl-create.txt shares select zspink1 replication action set target=OSC-ZS3-2-01-N2 set pool=Pool-1 set use_ssl=false commit cd / shares select zspink2 replication action set target=OSC-ZS3-2-01-N2ls -l set pool=Pool-1 set use_ssl=false commit # cat source-repl-sync.txt shares select zspink1 replication select action-000 sendupdate cd / shares select zspink2 replication select action-000 sendupdate # cat source-repl-status.txt shares select zspink1 replication select action-000 show shares select zspink2 replication select action-000 show # cat target-repl-show.txt shares replication sources show shares replication sources select source-002 show shares replication sources select source-002 select package-000 show Clean up Replication # cat source-repl-destroy.txt confirm shares select zspink1 replication destroy action-000 confirm shares select zspink2 replication destroy action-000 # cat target-repl-destroy.txt confirm shares replication sources select source-002 destroy package-001 confirm shares replication sources select source-002 destroy package-000 Reverse Replication passing projects into the script.
$ cat target-repl-reverse.sh

#!/bin/bash
myzfs=10.80.54.182

# check parameters are passed
if [ $# -lt 1 ]; then
  echo
  echo "Usage: $0 project"
  echo
  echo "Example: $0 app05 sap01 na7 dbtest
  echo
  exit
fi

for var in "$@"
do

# Get packakages and projects current state
ssh -T davids_loc@$myzfs << EOF > temp.txt
shares replication sources select source-002 show
EOF

# Extract package that matches the project name
aa=`cat temp.txt | grep $var | awk '{print $1}'`

# Reverse replication package
echo "Reversing $aa $var"
ssh -T davids_loc@$myzfs << EOF
confirm shares replication sources select source-002 select $aa reverse
EOF

done

$ ./target-repl-reverse2.sh zspink5 zspink3
Reversing package-004 zspink5
Reversing package-002 zspink3
Reverse Replication reading projects file.
Current Status of Target Packages (all mis-matched)
source-002 OSC-ZS3-2-01-N1
            PROJECT                        STATE           LAST UPDATE
package-000 zspink2                        idle            Thu Oct 27 2016 20:49:10 GMT+0000 (UTC)
package-001 zspink3                        idle            Thu Oct 27 2016 20:49:14 GMT+0000 (UTC)
package-002 zspink5                        idle            Thu Oct 27 2016 20:49:27 GMT+0000 (UTC)
package-003 zspink1                        idle            Thu Oct 27 2016 20:56:46 GMT+0000 (UTC)
package-004 zspink4                        idle            Thu Oct 27 2016 20:57:27 GMT+0000 (UTC)

Source Project File List
$ cat projects.txt
zspink1
zspink2
zspink3
zspink4
zspink5

Run Reverse Replication for the projects within the file
$ ./target-repl-reverse2.sh
Project projects.txt found. Moving on to reverse replication..
Reversing package-003 zspink1
Reversing package-000 zspink2
Reversing package-000 zspink3
Reversing package-001 zspink4
Reversing package-000 zspink5
They're all local projects now on the target system.

Script
$ cat target-repl-reverse2.sh
#!/bin/bash
myzfs=10.80.54.182
file=projects.txt

# check project file exists
if [ -f "$file" ]; then
  echo "Project $file found. Moving on to reverse replication.."
else
  echo "Project $file not found."
  exit
fi

for i in `cat projects.txt`
do

# Get packages and projects current state
ssh -T davids_loc@$myzfs << EOF > temp.txt
shares replication sources select source-002 show
EOF

# Extract package that matches the project name
aa=`cat temp.txt | grep $i | awk '{print $1}'`

# Reverse replication package
echo "Reversing $aa $i"
ssh -T davids_loc@$myzfs << EOF
confirm shares replication sources select source-002 select $aa reverse
EOF

done
SHADOW MIGRATIONPerformance depends on a number of factors:
Considerations:
zfsb:shares default/tests> shadow show
Properties:
                        source = nfs://10.0.2.13/export/testnfs
                   transferred = (unset)
                   remainbytes = 164M
                       elapsed = 0h1m
                        errors = 0
                      complete = false
                    remaintime = (unset)
|